Excell Sprayer ES007

Home/Sprayers/Excell Sprayer ES007

Excell Sprayer ES007

Out of stock

Backpack sprayer with constant and adjustable pressure operating on a rechargeable battery.

ES007 is designed for the application of a range of approved products (nutrients, pesticides, fungicides, herbicides, insecticides and biocides – disinfectants) intended for use with backpack sprayers.

Email when stock available

Category:

Description

ES007 is a 20 litre backpack sprayer which is robust, reliable and very user-friendly.

The electric motor guarantees a very reliable output at constant pressure with minimal maintenance – other than routine cleaning and recharging of the battery.

The battery power gives a more consistent and accurate pressure output than most manual sprayers not only giving a better application, but it also reduced spray inaccuracies and waste. Pressure variations alone can lead to inaccuracies of 20% or more.

Its lightweight durable case increases operator comfort and the Li-Ion battery pack allows you to spray for hours.

The ergonomic design makes for a comfortable, accurate and no mess application on the outside, whilst on the inside the internal filter and shape make it very easy to wash out.

Safe to Use

  • Nutrients

  • Pesticides

  • Fungicides

  • Herbicides

  • Insecticides

  • Biocides

Not Safe to Use

  • Caustic Soda

  • Bleach

  • Strong Acids

  • Flammable Products

Testimonials

“Great quality, comfortable backpack, excellent battery capacity.”

S Watson, Farmer

“The best battery sprayer I’ve ever used. Exceptional quality for the price.”

Andy Jones, AJ Landscapes

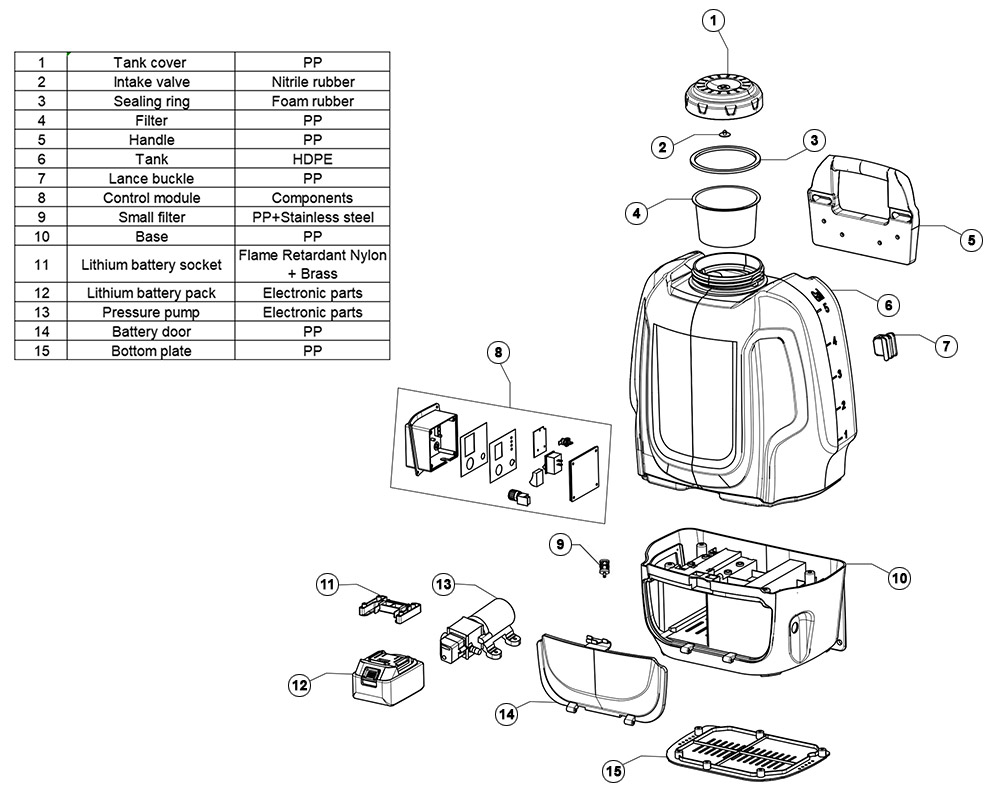
Technical Specifications

Backpack sprayer, with CONSTANT and adjustable PRESSURE, operating on a RECHARGEABLE battery:

  • Empty weight: 4.2 kg. (22.2 kg when full with 18 Litre)
  • Opaque/white polyethylene tank
  • Total capacity: 20 litres
  • Adjustable, padded carrying straps
  • Flexible padded back support
  • Electric reflex pump
  • Operating pressure of 1, 1.5 and 3 bar
  • Electronic control for adjusting pressure
  • Test switch
  • Lance equipped supplied with a complete set of nozzles (hollow cone, flat fan and deflector nozzles)
  • Tank filter
  • Filler filter
  • Battery Capacity 11.1 V 7800 mAh lithium-ion battery
  • Viton® O-rings create superior quality seals which are highly resistant to chemical damage, oxidation, UV exposure, fungus, weather, ozone and mould
  • Measurement range on the voltmeter of the battery capacity is 8.3 – 12.6 V
  • Battery CE&KC&UL certified
  • Dedicated 12 volt battery charger

Excell Sprayer Diagram

Preparing the Sprayer

  1. Remove all the components from inside the sprayer.
  2. Screw the lance onto the lance handle (Figure 1). Check that the seal is present inside the coupling (Figure 2).
  3. Make sure the battery is connected to the pump – open the battery housing door and carefully slide out the battery to check the connection (Figure 3).
  4. The battery should be charged but it is recommended that you connect to the charger via the charging point (Figure 4) on the control panel to ensure it is fully charged before first use.
  5. ONLY use the charger supplied with the sprayer.
  6. How to charge – connect the charger to the mains supply and then add the cable to the charging point. When charging the charger will show a red light. When fully charged this will have turned green (Figure 5) charging lights will indicate the level of charge.
  7. Always charge indoors, in a well-ventilated area and with nothing covering the charger.
  8. Check the filter is attached inside the sprayer (Figure 6).

Use

  1. Always ensure the products to be used are registered for use with backpack sprayers.
  2. Always apply according to the manufacturer’s recommendations and instructions of use, wearing the correct safety equipment and clothing.
  3. Add 2-4 litres of water to the sprayer.
  4. Always prepare the spray solution in a bucket prior to adding to the sprayer through the large filter.
  5. Screw the tank cover cap firmly back in place
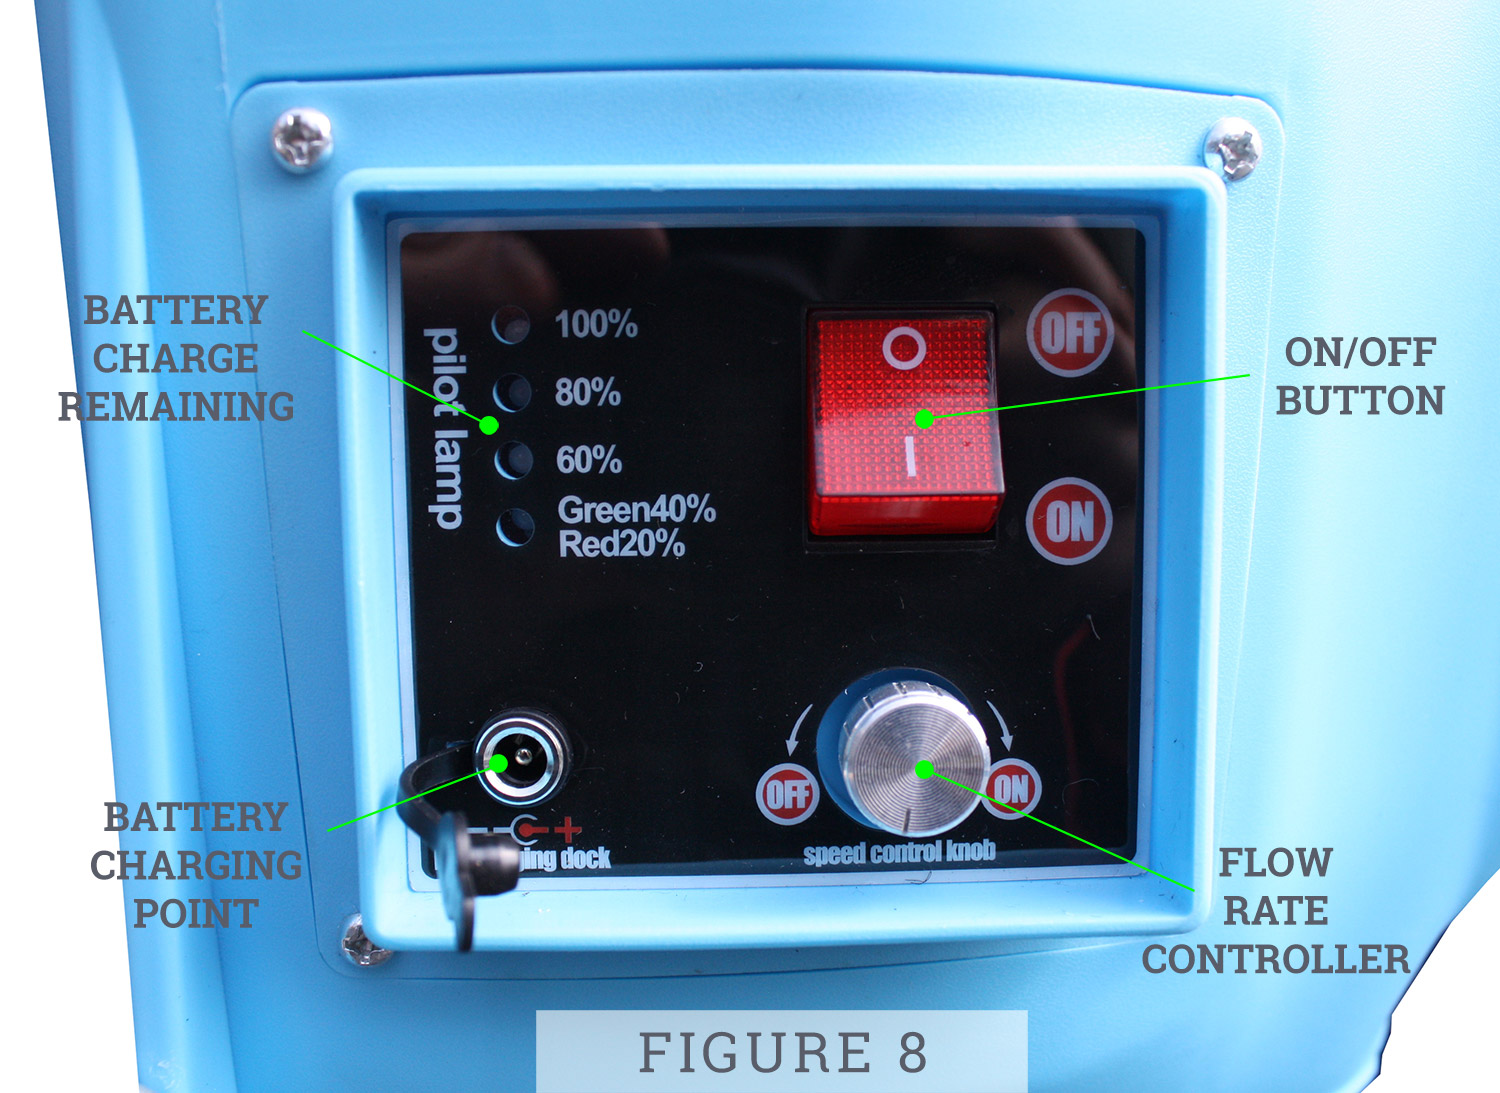
  6. Press the switch to “ON” (Figure 8)
  7. Select the desired pressure by turning the flow rate controller (Figure 8) until the desired flow is achieved (this can be done with water prior to adding the product to be applied).
  8. Squeeze the trigger for several seconds to allow material to flow through the pump.
  9. Squeeze the trigger to apply the product.
  10. The charger indicator lights will highlight the remaining battery life.
  11. Flip the switch to the ON position (Figure 8).

NOTE: If your motor stops and the voltmeter reading is low it means that you must recharge your battery.

Figure 8 Sprayer Control Panel

Maintenance

After every use:

  1. Collect the EXCESS mixture that remains in the tank and dispose of it according to the manufacturers instructions.
  2. Rinse the tank.
  3. Clean the tank’s filler filter.
  4. Clean the suction filter located on the base of the tank. This can gently be pulled upwards.
  5. Rinse both filters by running under a tap or submerging in a bucket.
  6. Refit the suction filter by gently pushing over the outlet.
  7. Rinse the spray system by spraying 2 to 3 litres of clean water (with or without an approved tank cleaner).
  8. Allow the tank to drain.
  9. Charge the battery before storing it.

NOTE: The sprayer must always be stored clean and empty (ideally dry if stored for long periods) without water or treatment product at a temperature higher than 5°C. The sprayer must be checked and the battery charged every 3 months.
DO NOT store the battery in extreme environments e.g. high/low temperature, humidity.

Safety

  • Never charge your sprayer in hot / cold or high humidity conditions.
  • Never connect (or disconnect) the charger to (or from) the mains supply with wet hands.
  • Only recharge the sprayer battery with the charger supplied with it.
  • Only recharge the sprayer battery indoors. Do not cover the charger whilst in use.
  • Do not use the charger if it is damaged.
  • Do not use the battery if it is damaged; replace it immediately.
  • Do not attempt to recharge batteries other than those supplied with the machine.

ALWAYS Wear protective GLOVES, GOGGLES and MASK or any other personal protective equipment required by local regulations (and as recommended on the product label) for each phase in the use of the sprayer: filling the tank, spraying, settings, draining, cleaning, changing the chemical product, maintenance.

Troubleshooting

MALFUNCTIONS OBSERVED POINTS TO CHECK ACTION NEEDED
Leak between the handle and the lance tube Seal is present and in good condition Reseal or replace the seal. Ensure the connector is tight
Once the machine is stopped, the lance continues to flow Lance handle Check the lance handle is securely switched off
The battery does not seem to charge a. Check that the charger is working properly (indicator lights) b.The battery is old a. Replace the charger if it is not working
b.Replace the battery
The battery does not seem to have its normal lifespan Check the age of the battery Replace the battery
The motor runs, but the machine
sprays weakly
Cleanliness of the suction filter on the base of the tank Clean the filter
The motor runs, but the machine does not spray a. The nozzle is clogged
b. The nozzle is clean
a. Clean the nozzle
b. Do not attempt to repair, contact Customer Service
The motor does not run a. The battery is not connected
b. The voltmeter reading is low
a. Connect the battery
b. Recharge your battery
Poor spraying a. Check the recommended positions for each nozzle
b. Nozzle calibration not optimised
c. Check correct nozzle selection
a. Use the recommended nozzle and positions
b. Stop and restart your sprayer
Leakage of water at the base of the machine Check the connections and condition of the pump and priming feed tubes Tighten if necessary
Replace if pierced